Natural Food Coloring for Cookies: Your Complete Guide
The first time I tried making natural food coloring for cookies with beet powder, I ended up with a muddy pink that bled right through the edges and dried patchy. The problem wasn't the natural food coloring - it was that I didn't understand how format and consistency work together before you ever touch a pigment.
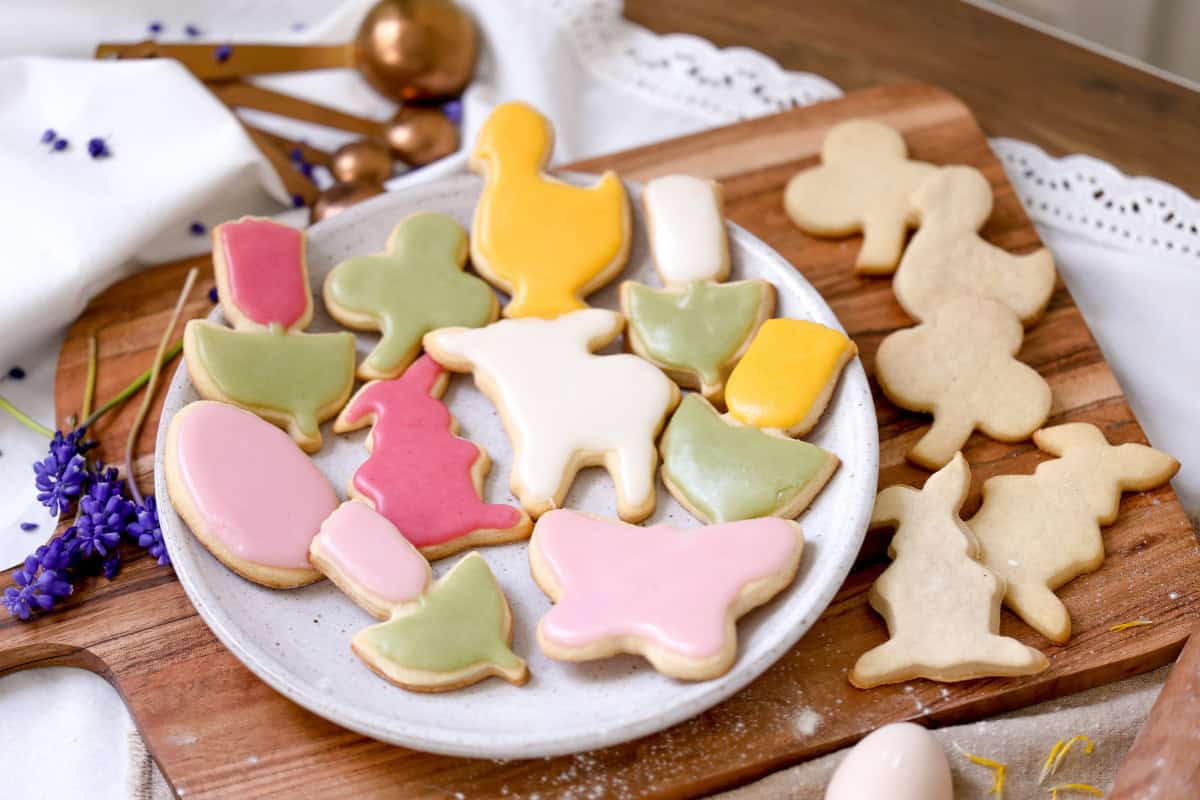
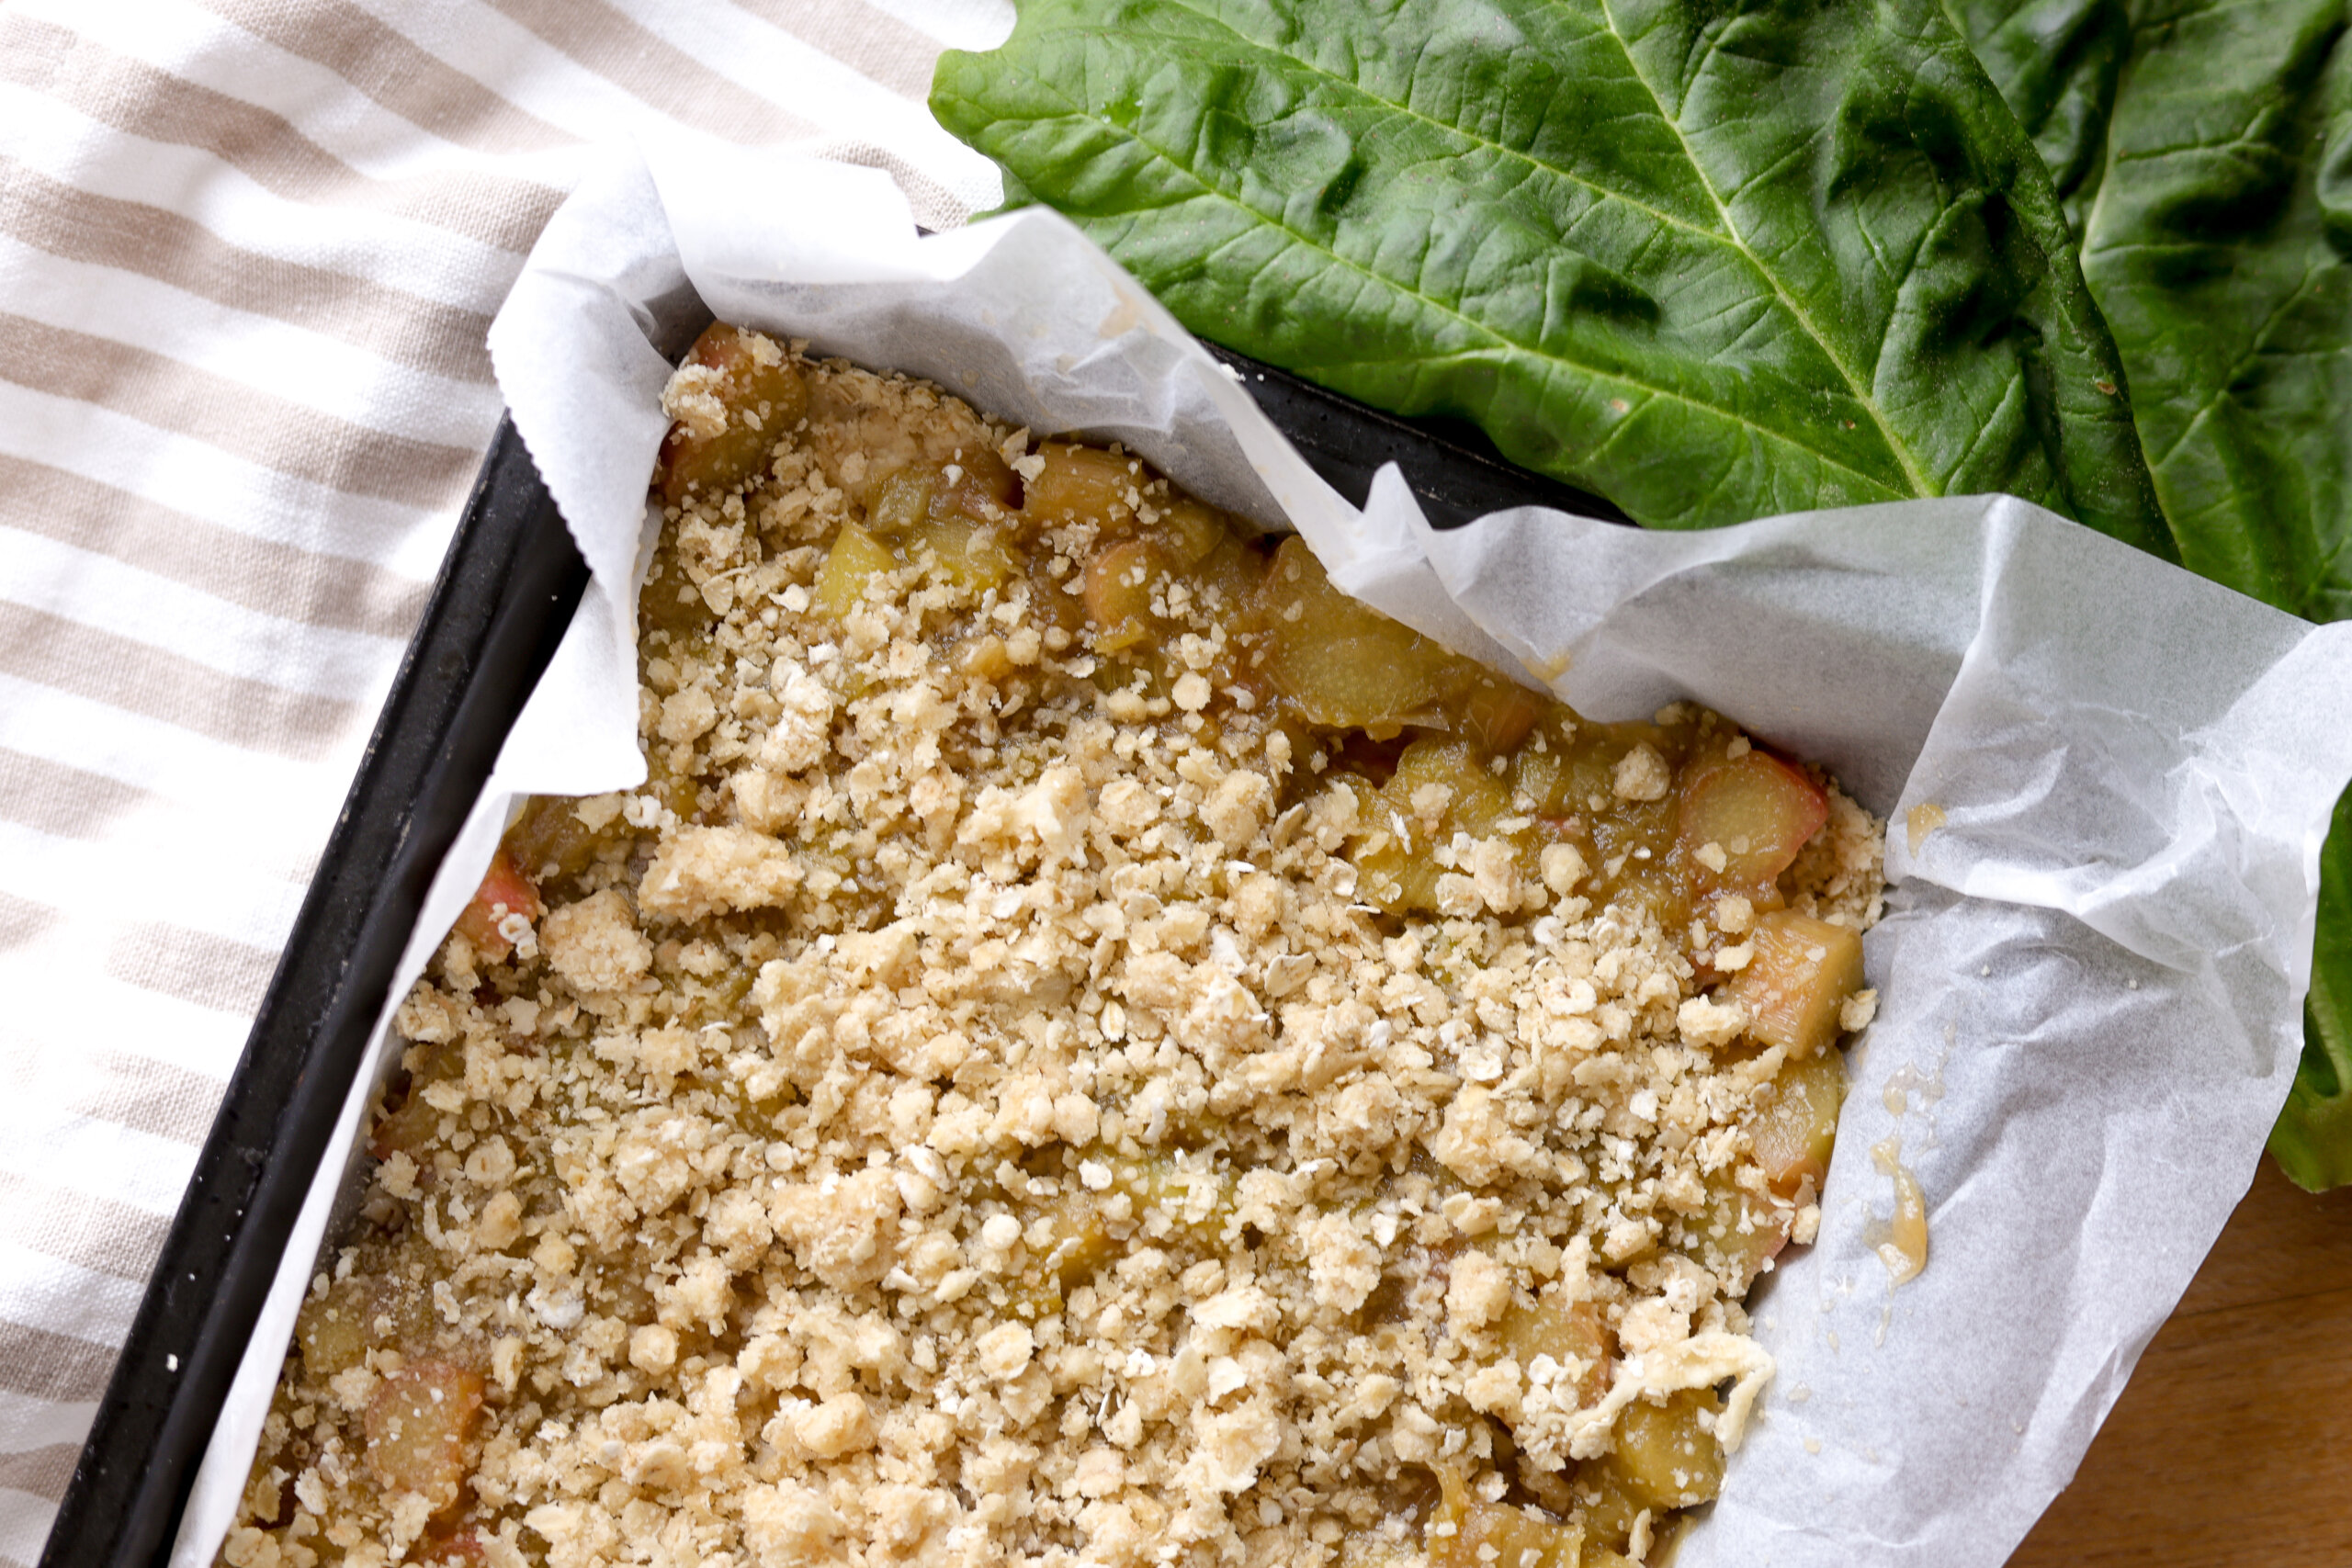
This guide covers every format, every application, and the exact powders and liquids that give you clean, vibrant shades without artificial dyes or synthetic chemicals - and if you need a cookie to decorate, start with my sourdough discard sugar cookies, they're built for this.
A Quick Look at the Recipe
⏱ Prep Time: 10 minutes
👩🏻🍳 Set Time: 2-4 hours
⏳ Total Time: ~4 hours 10 minutes
👥 Serving: Colors 24 sugar cookies
🔥 Calories: ~35 per decorated cookie (glaze only)
🥣 Main Ingredients: Powdered sugar, milk, honey, lemon juice, freeze-dried fruit powders
👌 Difficulty: Easy - no special equipment needed
Summarize and Save this Content On
Jump to:
- A Quick Look at the Recipe
- 🍇 Why Natural Food Coloring Works (When You Use It Right)
- 🍊 The Three Formats - and Why Format Matters
- 🍓 Natural Color Ingredients and What They Do
- 🥘 Ingredients
- 🍽 Equipment
- 🔪 How to Make Natural Cookie Glaze
- 🥄 Substitutions
- 📋 Variations
- 💭 Tereza's Top Tips
- ⚖️ Scaling
- ⏱️ Prep-Ahead
- 🥣 Storage
- 🧂FAQ
- Related
- Related
- 📖 Recipe
- 💬 Community
🍇 Why Natural Food Coloring Works (When You Use It Right)
Home bakers have been reaching for natural food dyes longer than the synthetic dye industry has existed. Plant-based pigments from real fruits, vegetables, and botanical sources colored food long before petroleum-derived chemistry entered the picture. The difference now is that freeze-dried powders, highly concentrated liquid formats, and organic food colorings have made it practical to get consistent, vivid color in a home kitchen - without the guesswork that plagued earlier generations of natural bakers.
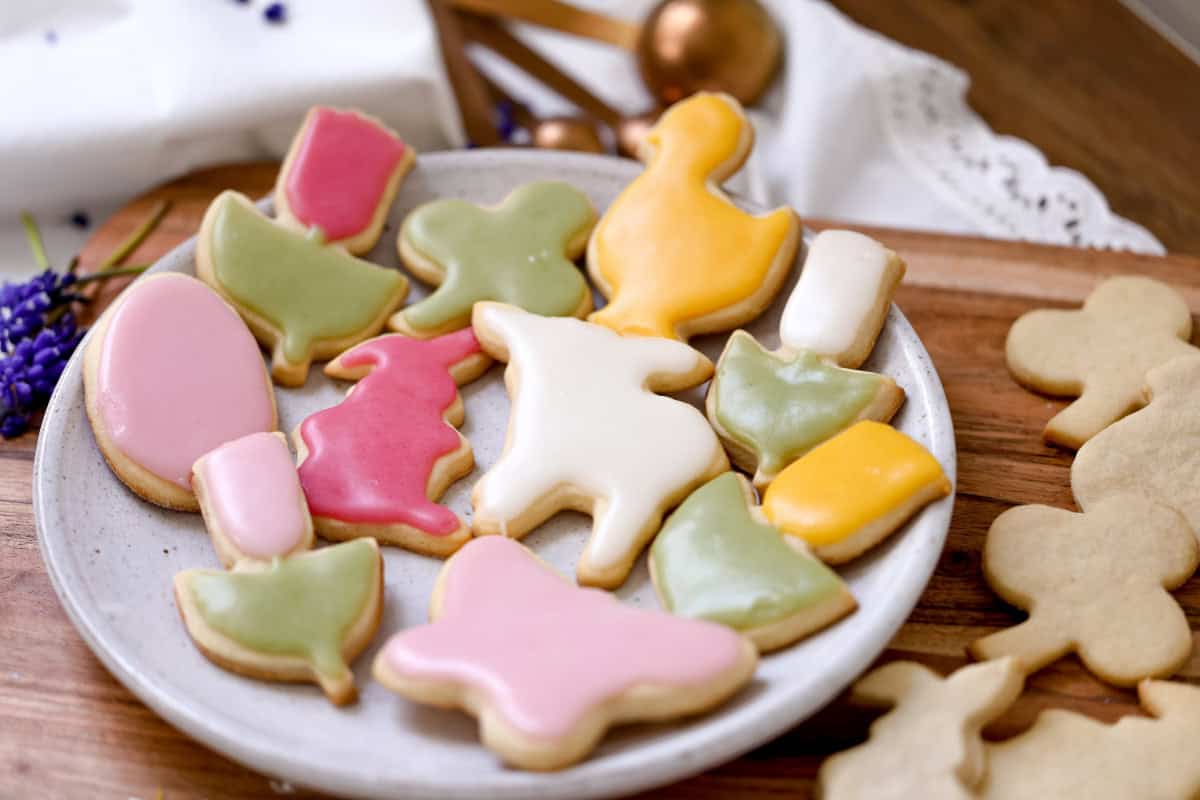
The clean-label question has also shifted. More home bakers are reading the ingredient label on their sprinkles and food dye bottles and deciding that artificial colors aren't something they want on cookies their kids are eating. Natural alternatives aren't a compromise anymore. When you use the right format for the right application, you get color payoff that holds up beautifully - especially on the flat surface of a glazed sugar cookie, which is honestly one of the most joyful canvases you can work with. If you're looking for a cookie to start with, my sourdough cut out cookies have a smooth, flat top that glazes beautifully.
🍊 The Three Formats - and Why Format Matters
This is where most recipes skip an essential step. Natural food coloring comes in three distinct ways, and using the wrong format for your specific application is the fastest way to wreck your glaze or your dough.
- Powdered color - freeze-dried fruit powders, beetroot powder, matcha powder, spirulina powder - are the most versatile for cookie work. They blend smoothly into dry ingredients for dough tinting, and they stir into glaze without adding significant liquid. The trade-off is that low-pigment food dye powders like matcha require more volume to achieve a target color, which can add a faint flavor. High-pigment options like freeze-dried strawberry or beet powder deliver significant color impact with a small amount. You can even make your own freeze-dried strawberry powder at home - it's simpler than it sounds and gives you the freshest, most concentrated color.
- Liquid food coloring - including beet root juice concentrate and other liquid natural food dyes - works well for larger-volume icing applications like flooding a full cookie tray. The challenge is that liquid adds volume to your glaze, which throws off ribbon consistency if you're not compensating. Highly concentrated natural liquid food dye formats help here, because you get vivid color from minimal volume - just drops of clear extract rather than tablespoons of juice.
- Gel and paste formats - these are the most common surface decoration colorants in professional decorating, and some natural options exist, though the complete range of shades is narrower than with synthetic gel colors. For royal icing work and intricate designs, gel gives you precise control and minimal impact on texture.
For most home bakers doing glaze and royal icing work on cut-out cookies, powdered color and highly concentrated liquid format are the best choice. They give you the widest range of vibrant colors without destabilizing your base.
🍓 Natural Color Ingredients and What They Do
Choosing your pigment is as much about expected shade as it is about flavor. These are the natural ingredients I've tested for cookie applications, and what to expect from each.
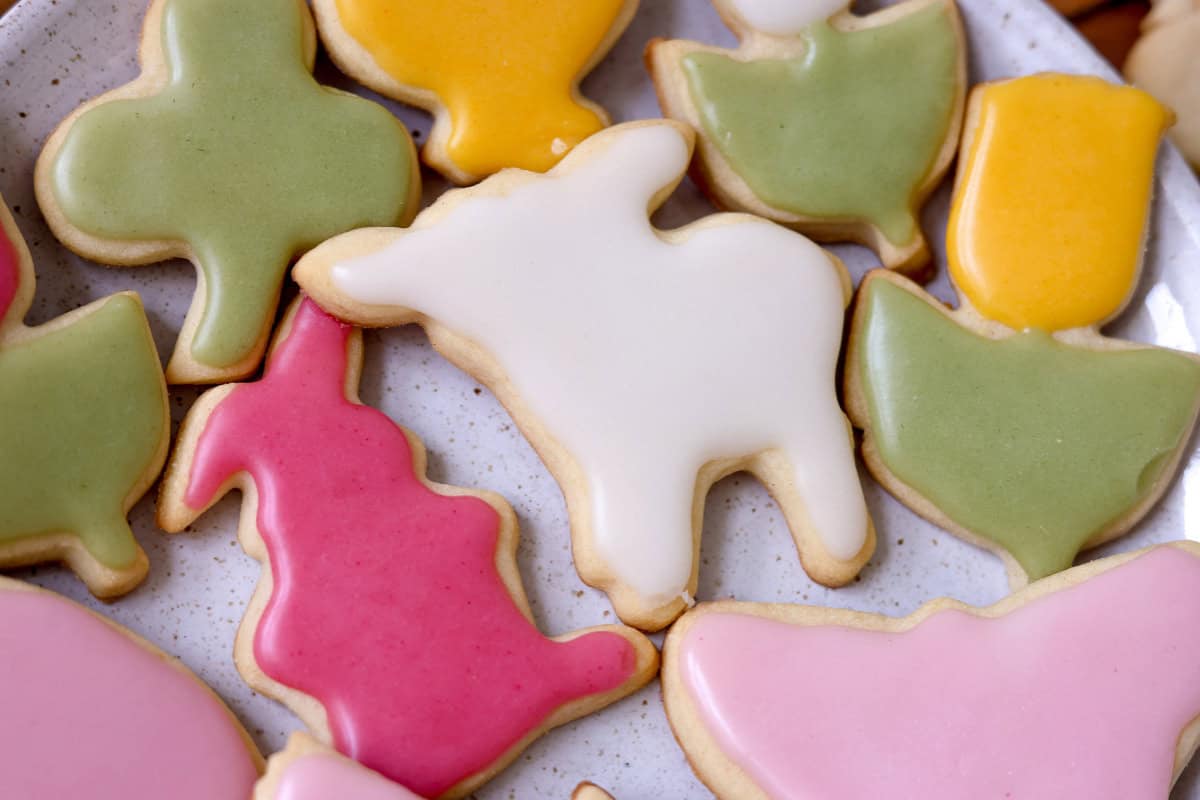
- Freeze-dried strawberry powder - gives you a true pink-red with strong color payoff. A small amount goes further than beetroot powder for bright pink shades. Flavor is present but mild in glaze applications. Making it yourself gives you the most concentrated result.
- Freeze-dried blueberry powder - produces a soft blue-purple. This is one of the only natural sources for anything approaching blue icing without using butterfly pea flower. The shade shifts depending on your glaze's acidity.
- Freeze-dried mango powder - delivers peachy orange and sunny yellows depending on concentration. True orange shades are hard to achieve with natural colorings, and mango powder gets you closest without beta carotene supplements.
- Beetroot powder - reliable soft pink to deep rose. One of the most widely available options at grocery stores and health food stores. Lower color payoff than freeze-dried strawberry, but the earthy flavor is less noticeable in sweet glaze.
- Young barley powder - gives you a clean, true green without the strong flavor that matcha brings. It's my go-to for green glaze because spirulina can occasionally read slightly blue-green depending on the batch, while barley stays reliably grassy and bright. Start with a quarter teaspoon and build from there.
- Spirulina powder - another option for bright green with minimal flavor impact in small quantities. Slightly more variable in tone than young barley, but widely available and very effective.
- Turmeric - vivid yellow with earthy warmth. A small amount produces a strong sunny yellow; use it sparingly as it can shift orange at higher concentrations. I use turmeric constantly in my kitchen - it's also the base of my turmeric ginger cinnamon tea if you want to see how the flavor behaves in a different context.
- Butterfly pea flower powder - produces a striking blue-purple and is one of the most interesting natural food colors available. It's pH-sensitive, producing different visual effects depending on what's in your glaze. Adding lemon juice shifts it toward purple; keeping the base neutral gives you a deeper blue.
🥘 Ingredients
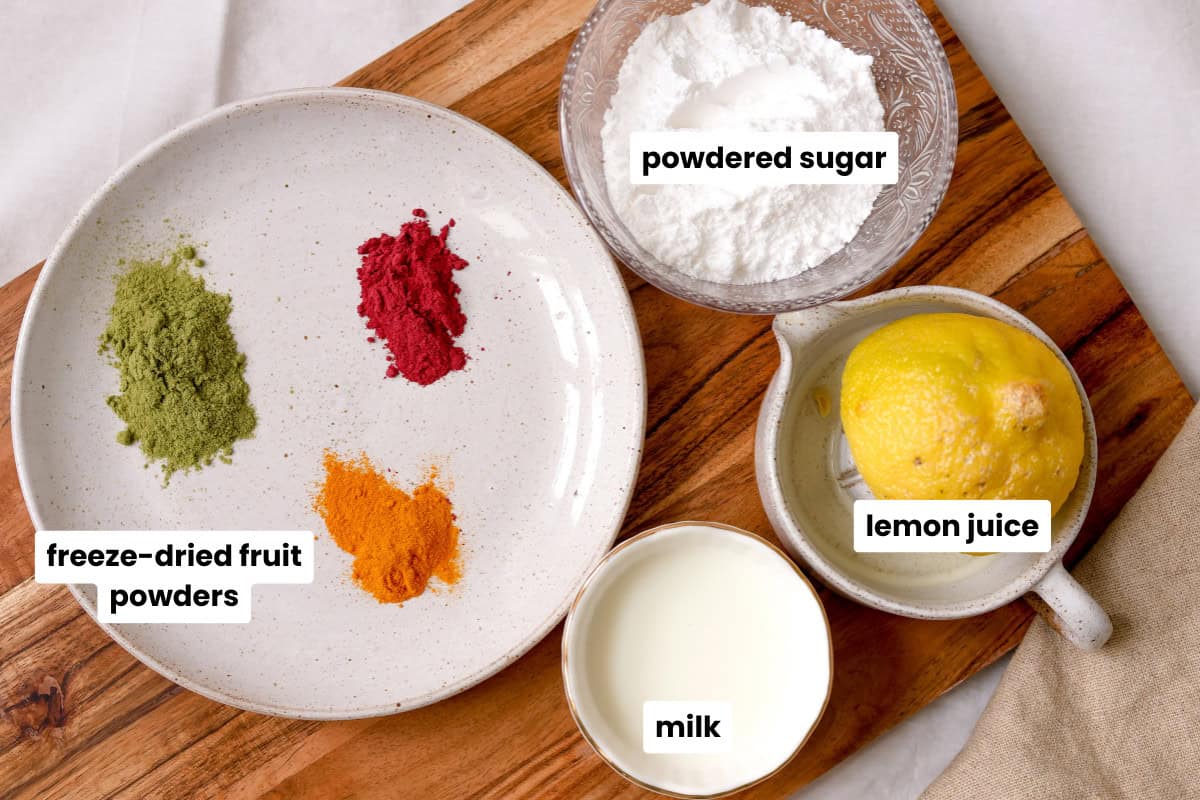
- Powdered sugar - this is the structural base. It dissolves instantly, creates a smooth spreadable glaze, and dries with a slight sheen. Granulated sugar doesn't work for glaze - it stays gritty.
- Milk - controls viscosity. Whole milk gives the richest result, but two percent works fine. Skim milk makes ribbon consistency harder to achieve.
- Honey - adds body and elasticity, which prevents cracking as the glaze dries. Maple syrup works as a substitute and adds a subtle warmth that's especially good on spiced cookies.
- Lemon juice - tightens the structure and adds brightness. Optional, but especially useful when you're adding powdered pigments that can loosen the glaze slightly.
- Freeze-dried fruit powder of your choice - see the guide above for which powder to use for your target color.
🍽 Equipment
- Fine-mesh sieve
- Small whisk or fork
- Piping bags - disposable bags are easiest; snip the tip small and work up from there. Have a few on hand in case one tears mid-session. A zip-top bag with one corner snipped is a workable substitute, though with less precision.
- Squeeze bottles - a good alternative to piping bags for flooding larger areas, but they can clog if the glaze thickens. Keep a toothpick nearby to clear the tip.
- Small spoon and toothpick - if you're not piping, a spoon spreads the glaze and a toothpick neatens the edges. No special equipment needed.
- Parchment paper
- Small glass or ceramic bowls
🔪 How to Make Natural Cookie Glaze
- Sift the powdered sugar. Use a fine-mesh sieve. This step protects your piping tip and your flow. Lumps do not break down once the sugar is wet.
- Add the wet ingredients. Pour in 2 tablespoons of milk, 1 teaspoon of honey, and lemon juice if you're using it. Start with 2 tablespoons of milk even if the glaze looks thick. You can always add more; you can't take it back.
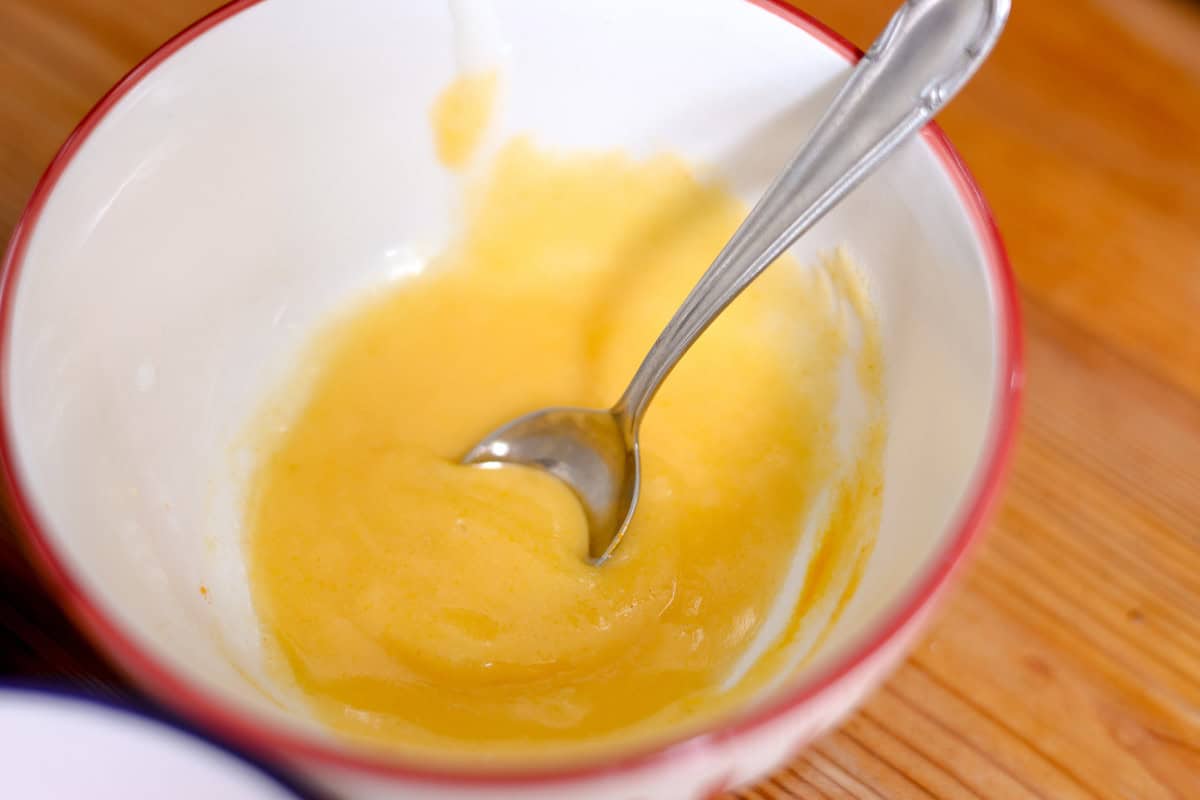
- Whisk until smooth. Use a small whisk and stir in tight, controlled motions for about 30 seconds. Don't overwork it - too much air creates bubbles on your finished cookies.
- Do the ribbon test. Lift the whisk and let the glaze fall back into the bowl. It should form a thick ribbon that sits on the surface for 5-8 seconds before softening and disappearing. If it levels instantly, it's too thin. If it doesn't soften at all, it's too thick. Adjust with milk (half a teaspoon at a time) or powdered sugar (one tablespoon at a time) and test after every adjustment.
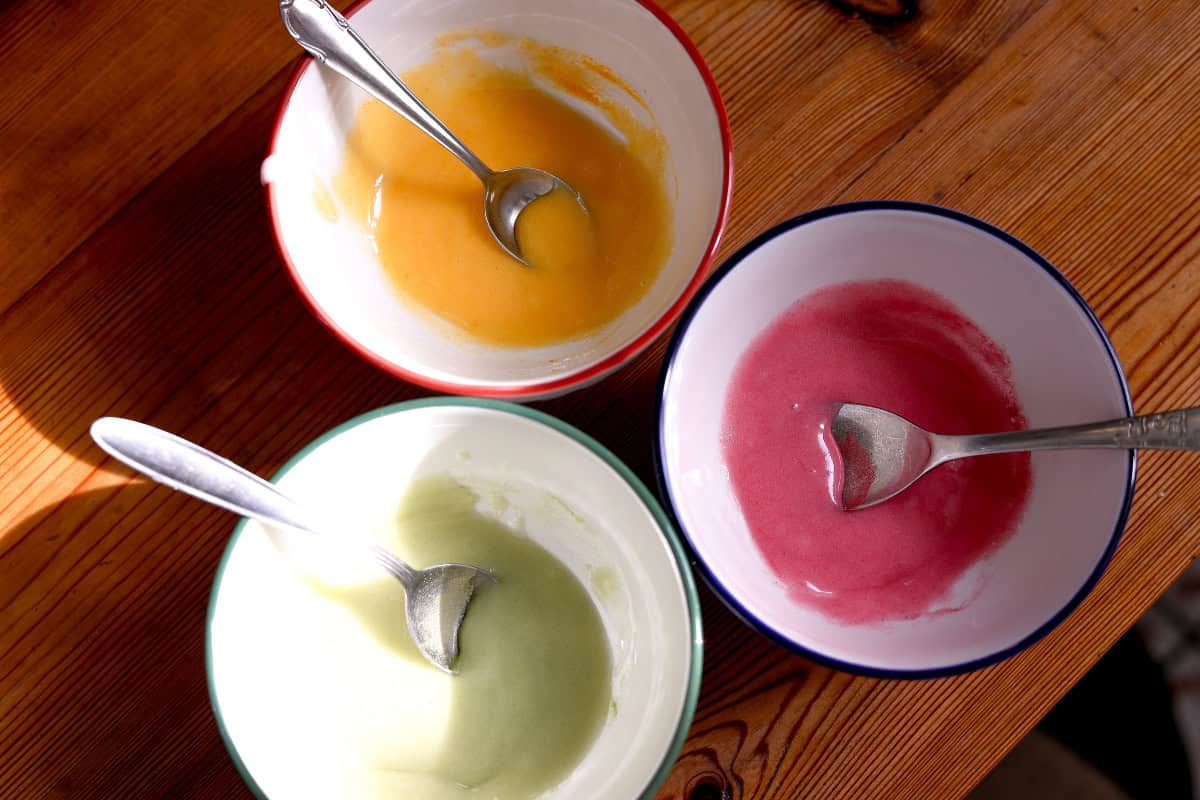
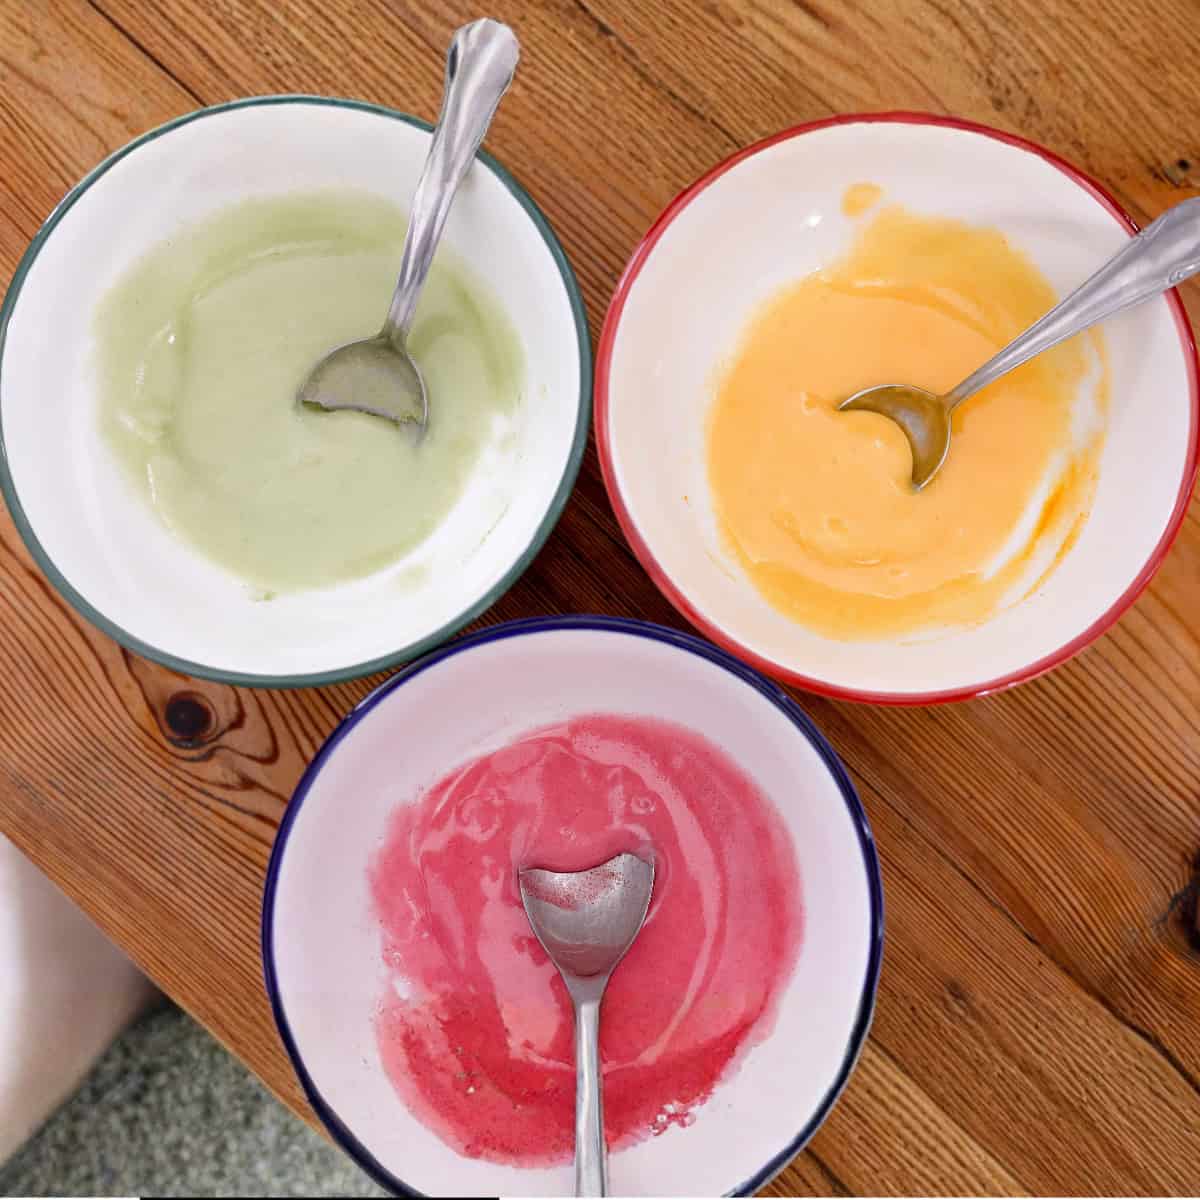
- Divide and add color. Once you have ribbon consistency, divide the glaze into separate bowls - one per color. Add your freeze-dried powder a quarter teaspoon at a time, whisking fully between additions. If the glaze thickens after adding pigment, adjust with milk a drop at a time. Do the ribbon test again before piping.
- Transfer to piping bags. Snip the tip small - you can always make it bigger. Test on parchment before you commit to a cookie.
- Pipe at a 45-degree angle. Let the glaze fall naturally onto the cookie. Don't press hard. Steady movement gives you clean, consistent color.
🥄 Substitutions
- Milk - any plant-based milk works here. Oat milk gives the closest result to whole milk in terms of body. Coconut milk adds a very subtle tropical flavor that's pleasant on vanilla cookies.
- Honey - maple syrup is a 1:1 swap and the flavor difference is minimal in a sweet glaze. Agave nectar works too and is the most neutral in flavor.
- Freeze-dried powder - beetroot powder is easier to find at most grocery stores and health food stores if you can't source freeze-dried fruit powder. Expect softer, more muted shades. Turmeric is similarly widely available for yellow.
- Lemon juice - lime juice works the same way structurally and adds a slightly different citrus note.
📋 Variations
- Cookie painting - thin the glaze significantly with milk until it's the consistency of watercolor painting and use a small food-safe brush to paint directly onto a flat surface. This technique works beautifully with butterfly pea powder for a watercolor effect on soft-frosted sugar cookies. I use a similar painting technique on sourdough bread - the sourdough bread painting post shows the brush technique if you want a visual reference.
- Spoon and toothpick method - no piping bag needed. Spoon a small amount of glaze onto the center of the cookie and use the back of the spoon to spread it toward the edges. Then take a toothpick and run it along the border to neaten the line and push any pooling glaze back into shape. This is slower than piping but gives you a clean, even coat with no equipment beyond what's already in your kitchen drawer.
- Edible paint layer - let your base glaze dry completely first, then apply a second layer of concentrated glaze tinted with a different natural color. This lets you build intricate designs without color bleeding.
- Dough tinting - freeze-dried powders work directly in dough too, not just glaze. Add them with the dry ingredients in a single batch of sugar cookie dough. Start with half a teaspoon and build up. The color will be softer than glaze application, but it looks beautiful as a subtle base under clear glaze. My sourdough chocolate chip cookies use a similar enriched dough if you want to try tinting a cookie dough that already has great structure.
- Blue icing with butterfly pea - make your base glaze, then stir in butterfly pea flower powder. Add a drop of lemon juice to shift toward purple, or leave it neutral for a deeper blue. This is one of the most striking results you can achieve without artificial dyes.
💭 Tereza's Top Tips
Getting ribbon consistency right before you add any pigment is non-negotiable. Powdered colors absorb liquid slightly as they hydrate, so your glaze will always tighten a little after adding color. If you add pigment to a glaze that's already on the thin side, it won't tighten enough to recover - it will just bleed. Nail the ribbon first, then add color and re-test.
⚖️ Scaling
This glaze recipe scales easily. Double or triple the base and divide into as many color bowls as you need. For a larger-volume icing application on multiple trays of cookies, make the base in one batch to ensure consistent color, then divide before adding pigment.
⏱️ Prep-Ahead
You can make the base glaze (without color) up to 3 days ahead and store it in an airtight container in the fridge. Bring it to room temperature and rewhisk before dividing and adding color. Expect to add a few drops of milk to restore ribbon consistency, since the glaze tightens as it chills.
🥣 Storage
Once the glaze is completely dry - about 2 to 4 hours at room temperature - you can stack cookies with parchment paper between each layer. Store in an airtight container at room temperature for up to one week. In a humid environment, the glaze may stay tacky longer; a small silica gel packet in the container helps (don't let it touch the cookies directly).
To freeze, let the glaze dry fully first. Layer with parchment in a freezer-safe container and freeze for up to 3 months. Thaw at room temperature in the sealed container to prevent condensation from dulling or stickying the glaze surface. Don't refreeze once thawed.
Unglazed cookies keep at room temperature for up to 2 weeks or frozen for up to 6 months. Glaze them fresh when you're ready to decorate. Leftover glaze keeps in the fridge in an airtight container for up to 3 days - rewhisk at room temperature and add a few drops of milk to restore consistency before using.
🧂FAQ
Yes. Natural food colorings made from real fruits, vegetables, and botanical sources don't contain the synthetic chemicals found in conventional artificial dyes. They're derived from natural sources like beetroot, turmeric, spirulina, and freeze-dried fruit powders - ingredients you'd find in any kitchen or health food store.
Artificial colors are made with petroleum-derived chemistry specifically engineered for maximum color intensity. Natural dyes work with pigments that occur in plants, which are inherently softer and more variable. Freeze-dried fruit powders and highly concentrated natural liquid food dye formats give you the best results - significantly more vibrant shades than older liquid natural food dyes.
Powdered colorings have minimal impact on texture when used in small amounts. Liquid formats add volume and can affect ribbon consistency if you're not adjusting your liquid ratios. Always add color after achieving the right glaze consistency, and re-test the ribbon before piping.
Butterfly pea flower powder is the most reliable natural alternative for blue and purple shades. It's pH-sensitive - adding lemon juice shifts it toward purple. Freeze-dried blueberry powder gives a softer blue-purple. These are the closest options for blue icing without artificial dyes.
Yes. Powdered colorings work well in royal icing work. Add them after your icing reaches the right consistency for your application (stiff peak for outlines, flood for filling). The color payoff may require slightly more powder than you'd use with synthetic dye, but the result is clean and stable once dry.
Most health food stores carry them, and they're widely available online. Look for pure powders with no additives on the ingredient label - no fillers, no anti-caking agents. Certified organic farms often produce them and sell through specialty retailers. The supplement aisle of larger grocery stores sometimes carries them as well.
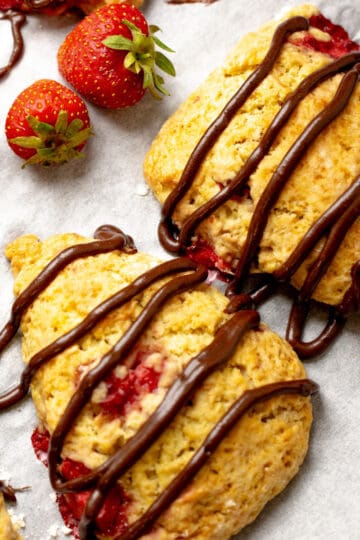
Made these? I'd love to know which color was your favorite - drop a comment below and let me know which powder you used. And if you're looking for a cookie to decorate, my sourdough apple cinnamon scones with glaze are another great canvas for natural color.
Related
Looking for other recipes like this? Try these:


Related
Looking for other recipes like this? Try these:


📖 Recipe
Natural Cookie Glaze
Equipment
- spoon and toothpick
- Small glass or ceramic bowls
Ingredients
- 150 g Powdered sugar
- 2.5 tablespoon Milk
- 1 teaspoon Honey or maple syrup
- ½ teaspoon Lemon juice
- Freeze-dried fruit powder
Instructions
- Sift the powdered sugar. Use a fine-mesh sieve. This step protects your piping tip and your flow. Lumps do not break down once the sugar is wet.150 g Powdered sugar
- Add the wet ingredients. Pour in 2 tablespoons of milk, 1 teaspoon of honey, and lemon juice if you're using it. Start with 2 tablespoons of milk even if the glaze looks thick. You can always add more; you can't take it back.2.5 tablespoon Milk, 1 teaspoon Honey, ½ teaspoon Lemon juice
- Whisk until smooth. Use a small whisk and stir in tight, controlled motions for about 30 seconds. Don't overwork it - too much air creates bubbles on your finished cookies.
- Do the ribbon test. Lift the whisk and let the glaze fall back into the bowl. It should form a thick ribbon that sits on the surface for 5-8 seconds before softening and disappearing. If it levels instantly, it's too thin. If it doesn't soften at all, it's too thick. Adjust with milk (half a teaspoon at a time) or powdered sugar (one tablespoon at a time) and test after every adjustment.
- Divide and add color. Once you have ribbon consistency, divide the glaze into separate bowls - one per color. Add your freeze-dried powder a quarter teaspoon at a time, whisking fully between additions. If the glaze thickens after adding pigment, adjust with milk a drop at a time. Do the ribbon test again before piping.
- Transfer to piping bags. Snip the tip small - you can always make it bigger. Test on parchment before you commit to a cookie.
- Pipe at a 45-degree angle. Let the glaze fall naturally onto the cookie. Don't press hard. Steady movement gives you clean, consistent color.
Comments
No Comments