How to Paint on Sourdough Bread {Recipe with Video}
Add a showstopping loaf of painted sourdough bread for your easter brunch table with this simple recipe.

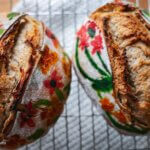
I love baking crusty sourdough loaves and I also love a beautifully decorated easter brunch table. When I saw a new trend pop up of a sourdough loaf adorned with beautiful flowers while scrolling on Pinterest, I knew this was something I wanted to try! Beautiful spring flowers on homemade bread is so on brand for Free to Flower. I don't have any special artistic skills, but I managed a simple floral design using a set of paint brushes and edible gel food coloring. I found the process of painting to be a fun hobby that creates a colorful loaf of bread that always brings a smile to my face.

This article may contain affiliate links, which means I make a small commission at no extra cost to you. As an Amazon Associate, I earn from qualifying purchases at no extra cost to you. You can read the full disclosure policy.
Why You'll Love This Recipe
- A fun activity for the whole family - getting your kids involved in bread making doesn't get easier than this. Especially for older kids, coming up with their own designs turns each loaf into a work of art
- Creating floral designs or pretty prints is a simple way to keep bread baking fun & interesting as well as catering to different seasons of the year
- Gift of food - sourdough bread is a great gift, a painted loaf of sourdough is even better!
Ingredients & Tools
- loaf of sourdough bread dough proofed in the fridge overnight (you can find instructions on how to proof sourdough in the fridge in this post)
- various colors of gel food coloring
- paint brushes
- scoring knife

Instructions
- When your sourdough loaf is done proofing in the fridge, take it out and turn out onto a piece of parchment paper
- Make sure the surface is not covered in a large amount of flour - if it is, gently brush excess flour off, to make the surface as even as possible
- Prepare a small glass of water and a plate (or a clean palette) for your food coloring gel colors
- Squirt a little bit of each color you want to use onto the plate. Use white food coloring to brighten the color shades. Use a little water or alcohol to dilute the gel colors.
- Dip your brush and let your imagine run wild! Heart for Valentine's Day, hand-painted flowers or a bouquet of spring flowers for Easter.
- Once your pain dries, you can go back over to add shading or any other details.
- Score your bread and bake as usual (if you need a sourdough recipe, check out THIS POST)

Tips
- Use Edible Markers or Food Coloring: Opt for edible markers or food coloring specifically designed for use on baked goods. These are safe to consume and come in a variety of colors. Go for natural coloring whenever possible!
- Practice on Paper First: If you're new to drawing on bread, practice your designs on paper first to get a feel for the markers or food coloring and to plan your design.
- Keep it Simple: Start with simple designs and gradually work your way up to more complex ones. Intricate details can be challenging to achieve on bread, especially if the surface is not entirely smooth.
- Apply Gentle Pressure: When drawing on the bread, apply gentle pressure to avoid tearing or damaging the surface. Let the marker or food coloring do the work for you.
- Experiment with Different Techniques: Explore different drawing techniques such as stippling, hatching, or blending colors to create interesting effects on the bread.
- Be Patient: Take your time when drawing on bread and allow each layer of color to dry before adding additional details. Rushing the process can lead to smudges and smears.

FAQ
Is it safe to paint on sourdough bread?
Yes, it is generally safe to paint on sourdough bread as long as non-toxic, edible paints are used. Make sure the paints are specifically labeled as food-safe.
What type of paint should I use?
Use food-grade paints that are safe for consumption. These can include natural food coloring, edible marker, or food-safe paint specifically designed for decorating baked goods.
Can I eat the painted sourdough bread?
Yes, you can eat the painted sourdough bread, given that you used edible paint..
Will the paint alter the taste or texture of the bread?
Edible paints are formulated to have minimal impact on taste and texture. However, using excessive amounts of paint may affect the bread's texture or taste slightly.
How long does the paint last on sourdough bread?
The longevity of the paint depends on various factors such as the type of paint used, storage conditions, and handling. Generally, painted designs may start to fade or degrade over time, especially if the bread is exposed to moisture or handling.
Are there any special techniques for painting on sourdough bread?
Experimentation with different painting techniques can yield interesting results. Some techniques to try include watercolor effects, stencil designs, or using edible ink to create intricate patterns.
Can I paint on sourdough bread before or after baking?
You can paint on sourdough bread either before or after baking, depending on your preference and the type of paint you're using. If painting before baking, ensure the paint is heat-safe. If painting after baking, allow the bread to cool completely before decorating.
Are there any tips for achieving vibrant colors on sourdough bread?
To achieve vibrant colors, use concentrated food coloring or gel-based food colorings. Apply multiple layers of paint if necessary, allowing each layer to dry before adding the next.

Storage
- Wrap it carefully: Once the painted sourdough bread has fully cooled, wrap it gently in food-safe plastic wrap or wax paper. Ensure that the wrap is not too tight to avoid damaging the painted surface.
- Store in an airtight container: Place the wrapped painted sourdough bread in an airtight container to protect it from exposure to air, which can lead to drying out and potential damage to the artwork.
- Avoid moisture: Keep the painted sourdough bread away from moisture to prevent the paint from smudging or running. Moisture can also cause the bread to become soggy or moldy.
- Consume within a few days: While properly stored, painted sourdough bread can last for several days. However, for the best taste and texture, it's recommended to consume it within a few days of painting.
- Consider freezing: Wrap the bread tightly in plastic wrap, then place it in a freezer-safe bag or container. Thaw the bread at room temperature when you're ready to enjoy it again.
How to Paint on Sourdough Bread
Materials
- various colors of gel food coloring
- paint brushes
- scoring knife
- loaf of sourdough bread dough proofed in the fridge overnight
Instructions
- When your sourdough loaf is done proofing in the fridge, take it out and turn out onto a piece of parchment paper
- Make sure the surface is not covered in a large amount of flour - if it is, gently brush excess flour off, to make the surface as even as possible
- Prepare a small glass of water and a plate (or a clean palette) for your food coloring gel colors
- Squirt a little bit of each color you want to use onto the plate. Use white food coloring to brighten the color shades. Use a little water or alcohol to dilute the gel colors.
- Dip your brush and let your imagine run wild! Heart for Valentine's Day, hand-painted flowers or a bouquet of spring flowers for Easter.
- Once your pain dries, you can go back over to add shading or any other details.
- Score your bread and bake as usual (if you need a sourdough recipe, check out THIS POST)
Notes
- Use Edible Markers or Food Coloring: Opt for edible markers or food coloring specifically designed for use on baked goods. These are safe to consume and come in a variety of colors. Go for natural coloring whenever possible!
- Practice on Paper First: If you're new to drawing on bread, practice your designs on paper first to get a feel for the markers or food coloring and to plan your design.
- Keep it Simple: Start with simple designs and gradually work your way up to more complex ones. Intricate details can be challenging to achieve on bread, especially if the surface is not entirely smooth.
- Apply Gentle Pressure: When drawing on the bread, apply gentle pressure to avoid tearing or damaging the surface. Let the marker or food coloring do the work for you.
- Experiment with Different Techniques: Explore different drawing techniques such as stippling, hatching, or blending colors to create interesting effects on the bread.
- Be Patient: Take your time when drawing on bread and allow each layer of color to dry before adding additional details. Rushing the process can lead to smudges and smears
Storage
- Wrap it carefully: Once the painted sourdough bread has fully cooled, wrap it gently in food-safe plastic wrap or wax paper. Ensure that the wrap is not too tight to avoid damaging the painted surface.
- Store in an airtight container: Place the wrapped painted sourdough bread in an airtight container to protect it from exposure to air, which can lead to drying out and potential damage to the artwork.
- Avoid moisture: Keep the painted sourdough bread away from moisture to prevent the paint from smudging or running. Moisture can also cause the bread to become soggy or moldy.
- Consume within a few days: While properly stored, painted sourdough bread can last for several days. However, for the best taste and texture, it's recommended to consume it within a few days of painting.
- Consider freezing: Wrap the bread tightly in plastic wrap, then place it in a freezer-safe bag or container. Thaw the bread at room temperature when you're ready to enjoy it again.


Comments
No Comments