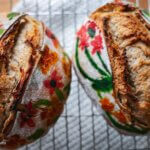
How to Paint on Sourdough Bread
Add a showstopping loaf of painted sourdough bread for your easter brunch table with this simple recipe.
Servings 1 loaf
Ingredients
- various colors of gel food coloring
- paint brushes
- scoring knife
- loaf of sourdough bread dough proofed in the fridge overnight
Instructions
- When your sourdough loaf is done proofing in the fridge, take it out and turn out onto a piece of parchment paper
- Make sure the surface is not covered in a large amount of flour - if it is, gently brush excess flour off, to make the surface as even as possible
- Prepare a small glass of water and a plate (or a clean palette) for your food coloring gel colors
- Squirt a little bit of each color you want to use onto the plate. Use white food coloring to brighten the color shades. Use a little water or alcohol to dilute the gel colors.
- Dip your brush and let your imagine run wild! Heart for Valentine's Day, hand-painted flowers or a bouquet of spring flowers for Easter.
- Once your pain dries, you can go back over to add shading or any other details.
- Score your bread and bake as usual (if you need a sourdough recipe, check out THIS POST)
Notes
- Use Edible Markers or Food Coloring: Opt for edible markers or food coloring specifically designed for use on baked goods. These are safe to consume and come in a variety of colors. Go for natural coloring whenever possible!
- Practice on Paper First: If you're new to drawing on bread, practice your designs on paper first to get a feel for the markers or food coloring and to plan your design.
- Keep it Simple: Start with simple designs and gradually work your way up to more complex ones. Intricate details can be challenging to achieve on bread, especially if the surface is not entirely smooth.
- Apply Gentle Pressure: When drawing on the bread, apply gentle pressure to avoid tearing or damaging the surface. Let the marker or food coloring do the work for you.
- Experiment with Different Techniques: Explore different drawing techniques such as stippling, hatching, or blending colors to create interesting effects on the bread.
- Be Patient: Take your time when drawing on bread and allow each layer of color to dry before adding additional details. Rushing the process can lead to smudges and smears
Storage
- Wrap it carefully: Once the painted sourdough bread has fully cooled, wrap it gently in food-safe plastic wrap or wax paper. Ensure that the wrap is not too tight to avoid damaging the painted surface.
- Store in an airtight container: Place the wrapped painted sourdough bread in an airtight container to protect it from exposure to air, which can lead to drying out and potential damage to the artwork.
- Avoid moisture: Keep the painted sourdough bread away from moisture to prevent the paint from smudging or running. Moisture can also cause the bread to become soggy or moldy.
- Consume within a few days: While properly stored, painted sourdough bread can last for several days. However, for the best taste and texture, it's recommended to consume it within a few days of painting.
- Consider freezing: Wrap the bread tightly in plastic wrap, then place it in a freezer-safe bag or container. Thaw the bread at room temperature when you're ready to enjoy it again.