What is the best temperature for a sourdough starter?
I am so happy that after about 3 months in the Czech Republic, my sourdough starter is finally doing so well. It took a while for it to mature, and for me to get all the variables just right to allow it to thrive. One thing I have learned from making sourdough on different continents is that each climate has its own unique set of requirements for sourdough. Whether it be different amounts of water and flour, or different temperature requirements. Finding the best temperature for my sourdough starter to thrive in has made particular difference. In this post, I will talk about all the elements that have helped me create a mature starter that is strong enough to bake delicious bread - in about 4 weeks' time.

What is a sourdough starter?
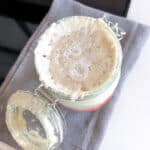
Sourdough starter is a living mixture of flour and water that serves as the heart and soul of traditional sourdough bread baking. It's a natural fermentation culture that contains a vibrant community of wild yeast and lactic acid bacteria. These microorganisms work in harmony to break down the carbohydrates in the flour, producing carbon dioxide gas and organic acids. This process not only leavens the bread, giving it its characteristic airy texture but also imparts the distinctive tangy flavor that sets sourdough apart from other types of bread.
Creating a sourdough starter involves mixing equal parts of flour and water and allowing the mixture to sit and ferment at room temperature. Over the course of several days to a week, the microorganisms present in the environment and the flour begin to colonize the mixture, creating a bubbly, aromatic concoction that's ready for bread making. Regular feedings with fresh flour and water maintain the starter's vitality and keep the microbial balance optimal.
Sourdough enthusiasts often develop a strong connection to their starters, nurturing and tending to them like a culinary heirloom passed down through generations. Each starter develops its own unique flavor profile, influenced by the local environment and the types of microorganisms present.
In the world of baking, a sourdough starter is more than just a leavening agent. It's a living culture that embodies the art and science of bread making. Its ability to transform simple ingredients into a complex and flavorful loaf is a testament to the wonders of natural fermentation and the symbiotic relationship between humans and microorganisms.

What can a sourdough starter be used for?
A sourdough starter is a versatile and essential ingredient in the world of baking, offering a range of uses beyond just bread. Its unique blend of wild yeast and beneficial bacteria imparts a distinctive tangy flavor and enhances the texture of baked goods. While sourdough bread is perhaps the most iconic creation, the applications of a sourdough starter extend to various culinary delights.
Pizza & Bread
- Sourdough Bread: The classic use of a sourdough starter is, of course, for making sourdough bread. The starter serves as the natural leavening agent, providing the dough with a rise and characteristic airy structure. The prolonged fermentation process enabled by the starter contributes to the bread's complex flavor profile and longer shelf life.
- Pizza Crust: Sourdough pizza crust offers a flavorful alternative to traditional crusts. The starter enhances the dough's fermentation, resulting in a slightly chewy and more complex base.
- Crackers and Flatbreads: Incorporating sourdough starter into cracker and flatbread recipes can yield snacks with a delightful tang and satisfying crunch.

Sweet Things
- Pancakes and Waffles: Incorporating a portion of sourdough starter into pancake or waffle batters can transform these breakfast staples. The starter not only adds a tangy kick but also contributes to a lighter and fluffier texture.
- Muffins and Quick Bread: Sourdough starter can be used in muffin and quick bread recipes, providing a unique twist on these familiar treats. The starter introduces depth of flavor and helps achieve a moist crumb.
- Cakes and Pastries: Surprisingly, sourdough starter can even be integrated into cakes and pastries. Its acidity can react with baking soda to provide leavening, while its unique flavor can lend an intriguing twist to sweet treats.

Others
- Flavorful Additions: Sourdough starter can be used to enhance the flavor of various recipes beyond baked goods. Adding a dollop to soups, stews, or even marinades can impart a subtle tang and depth.
How to make your own sourdough starter
Making your own sourdough starter is fairly easy. The ingredients are super simple, all it takes is just a little bit of persistence and time.
Ingredients:
- ½ cup of flour
- ½ cup of water
Instructions:
Day 1
In a clean glass or plastic container, mix ½ cup of flour and ½ cup of water until well combined. The mixture should have the consistency of a thick pancake batter. Cover loosely with a cloth and a rubber band or plastic wrap. This will allow air to enter but will keep contaminants and fruit flies out. Place in a spot where you believe the temperature will be best for your sourdough starter. More ideas on this are below.
Days 2-7
Once a day, discard about half of the starter (or transfer it to another container for later use). Add ½ cup of flour and ½ cup of water to the remaining starter. Stir well to combine. This daily feeding helps establish and strengthen the starter. It provides fresh nutrients for the yeast and bacteria to feed on.
Watch for Activity
As the days progress, you should start to see signs of fermentation. The signs include bubbles forming and the mixture becoming frothy. This indicates that the natural yeast and bacteria in the environment are colonizing and fermenting the starter. You can place a rubber band on the outside of the jar to mark the level of your starter at the beginning of the fermentation window. This will help you see how much it has risen by the next feeding.
Establishing a Feeding Schedule
Feed your starter around the same time each day. By around day 7, your sourdough starter should be active and ready to use. It is now suitable for recipes that call for "sourdough discard". It should have a pleasant sour smell, be bubbly, and double in size within a few hours after feeding. Once you get into a regular baking routine, you can always put your starter "on pause". Do this by placing it in the fridge right after a feed. The lower temperatures will allow you to only feed your starter once per week.

Ideal Temperature for Your Sourdough Starter
I don't think there is one ideal temperature for your sourdough starter. However, from my personal experience, temperatures between 25-28C (75-82F) have been ideal. This temperature range has worked super well both for my starter and for proofing. It allows me to stick to the shorter side of proofing times (ie. 8 hours instead of 12), speeding the whole process up. Higher temperatures led to over-proofing or turning my starter into a liquid mixture. This range might differ depending on your climate and humidity level. After a little bit of experimentation, you should be able to tell the right temperature to help you have an active sourdough starter.
Best Sourdough Starter Temperature Spots
Inside the oven with the oven light on is a great place. Just remember to put a note on the oven reminding yourself (and others) that your starter is inside. I've accidentally baked my starter on more than one occasion.
If your house has a warm ambient temperature, the kitchen counter is also a great spot. Just make sure to keep your sourdough starter container out of direct sunlight and to keep the top covered. This will prevent fruit flies from getting in, which you want to avoid at all costs.
I recently got a proofing box, since the temperatures in our stone house were always so low, and the sourdough cultures weren't loving it. Even though I was hesitant to make the initial purchase, I have to say I love it! Sourdough and all things relating to it have become so much easier when I can create an ideal environment, and control the temperature and even humidity that my sourdough starter and everything else ferments in.
Another option is a heating pad, similar to those used for kombucha making. I have also used the inside of my instant pot in the past. Simply boil some water, and pour it into your instant pot. Place your sourdough jar inside the pot and close the lid. This will create a nice warm environment, as well as a good humidity level. You will have to keep on refreshing the water throughout the day.

Other Sourdough Starter Tips
Water, Flour & water
- Use warm water. Especially if your house is on the cooler side, or you want to give your starter a little bit of a boost. Make sure not to use hot water, as that would kill your starter culture.
- Use the flour that you will do most of your baking with to feed your starter. This can be all purpose flour, rye flour, spelt flour, whole wheat flour, etc. Different flours will work.
- The hydration level of your starter will depend on many different factors, but mostly the flour you're using. You might find that you need to adjust the feeding ratio. This has been the case for me here in the Czech Republic. I now feed my starter 1 cup flour and ½ cup water. Don't dwell on this too much. You will come to learn what the desired starter consistency is and how to achieve it.
- Use filtered tap water. I've had the best results when using tap water that has been filtered through our Berkey water filter.
Time, Storage & feeding amounts
- When making a new starter, be patient. It will not be ready for bread baking right away, but you can still use it for all the sourdough discard recipes. I recommend that you stay away from placing a new starter in the fridge for at least a couple of weeks. This will ensure it has time to grow and eventually develop into a mature sourdough starter that will be suitable for bread baking.
- Glass jar is my preferred jar for storing active starter. If you're wondering what jar is best, check out my full post on that topic.
- If you find yourself baking smaller amounts (ie. for fewer people) and not using much starter, you can downside the feeding amounts to ¼ cup of flour and water. Similarly, if you need larger quantities of sourdough starter for your recipes, you can feed your starter 1 cup of each.

Sourdough Starter FAQ
How long do I have to wait from feeding the starter to baking?
This depends on..you guessed it..the temperature. And some other factors, like the flour you're using and the maturity of your starter. I typically like to wait at least 8 hours. However I know others who bake as soon as 4 hours after feeding. If you don't have a way of establishing the best temperature for your sourdough starter year round (such as a proofing box), the time will also vary depending on whether it's summer or winter time.
Does it matter what type of flour I use?
Different types of flours can have varying impacts on sourdough starter due to their composition, nutrient content, and microbial diversity. Here's how various flours can affect a sourdough starter:
All-Purpose Flour
All-purpose flour is a common choice for starting a sourdough starter. It provides a balanced blend of proteins and carbohydrates, which can support the growth of both yeast and bacteria. This type of flour usually results in a moderately active starter with a milder flavor profile.
Whole Wheat Flour
This flour contains more nutrients, including bran and germ, which can provide a richer food source for the microorganisms in the starter. Whole wheat starters tend to exhibit more robust fermentation and can develop a stronger sour flavor over time.
Rye Flour
Rye flour is known for its high enzymatic activity and favorable conditions for microbial growth. Using rye flour in a sourdough starter can lead to rapid fermentation and the establishment of a strong microbial community. Rye starters often have a distinct tangy flavor and can be used to kick-start other starters due to their higher microbial content.
Spelt Flour
Spelt flour is an ancient grain with a unique nutritional profile. It can contribute to a milder sourdough flavor while still providing a good environment for yeast and bacteria. Some bakers find that spelt starters have a more delicate and nutty taste.
Whole Grain Flours
Flours made from other whole grains like einkorn, emmer, or kamut can similarly enrich the starter's nutritional profile and lead to complex flavors. However, these flours may require adjustments in hydration and feeding frequency due to their varying absorbency.
Gluten-Free Flours
Gluten-free flours, such as rice flour, buckwheat flour, or sorghum flour, can be used to create gluten-free sourdough starters. However, gluten-free starters might not exhibit the same level of structure and rise as wheat-based starters due to the absence of gluten.
Combining Flours
Many bakers experiment by combining different types of flours to create a starter with a specific flavor profile or performance characteristics. For example, using a mix of all-purpose and whole wheat flour can strike a balance between fermentation activity and flavor development.

How do I know my starter is ready for use?
- Rising Activity: A mature starter should visibly rise and double in volume after a feeding. This rise indicates that the yeast population is active and producing carbon dioxide gas, which leads to leavening in your bread.
- Bubbling: Active fermentation results in the formation of bubbles throughout the starter. As you feed the starter, you'll notice a network of small and large bubbles forming on the surface and within the mixture.
- Aroma: A mature starter will have a pleasant and slightly tangy aroma. It should smell mildly sour but not overwhelmingly pungent or off-putting. A strong, vinegary smell might indicate that the starter is overripe or not well-balanced.
- Texture: The starter's texture should be elastic and slightly stretchy. When you scoop a spoonful, it should show signs of elasticity, indicating the presence of gluten development.
- Consistency: The starter's consistency might vary depending on hydration levels and flour type, but it should generally be creamy, with a somewhat smooth texture. A thin, watery starter might need more feeding and time to develop.
- Dome Formation: After feeding, your starter might form a slight dome on top. This suggests that the starter is actively producing gases and expanding.
- Predictable Behavior: A mature starter will show consistent patterns of rising and falling after feedings. If you notice that your starter consistently doubles in volume within a certain timeframe after feeding, it's a good sign of readiness.
- Time Elapsed: Depending on the temperature and feeding schedule, a starter can take anywhere from a week to a few weeks to mature. Generally, a mature starter should be consistently exhibiting the above signs over several feedings.
What is the "float test"?
This is a way to test if your starter is ready for bread baking. It involves putting a small teaspoon of your starter into a clear glass of water. If the sourdough starter rises to the top, that indicates sufficient amounts of carbonation. The starer is mature and ready to be used. If the starter immediately sinks to the bottom, you've got to continue maturing it for longer.
Sourdough Starter
Equipment
- glass jar
- Cloth
- Rubber band
- Proofing Box
Materials
- ½ cup water
- ½ cup flour of choice
Instructions
- Day 1: In a clean glass or plastic container, mix ½ cup of flour and ½ cup of water until well combined. The mixture should have the consistency of a thick pancake batter. Cover loosely with a cloth and a rubber band or plastic wrap. This will allow air to enter but will keep contaminants and fruit flies out. Place in a spot where you believe the temperature will be best for your sourdough starter. More ideas on this are below.
- Days 2-7: Once a day, discard about half of the starter (or transfer it to another container for later use). Add ½ cup of flour and ½ cup of water to the remaining starter. Stir well to combine. This daily feeding helps establish and strengthen the starter. It provides fresh nutrients for the yeast and bacteria to feed on.
- Watch for Activity: As the days progress, you should start to see signs of fermentation. The signs include bubbles forming and the mixture becoming frothy. This indicates that the natural yeast and bacteria in the environment are colonizing and fermenting the starter. You can place a rubber band on the outside of the jar to mark the level of your starter at the beginning of the fermentation window. This will help you see how much it has risen by the next feeding.
- Establishing a Feeding Schedule: Feed your starter around the same time each day. By around day 7, your sourdough starter should be active and ready to use. It is now suitable for recipes that call for "sourdough discard". It should have a pleasant sour smell, be bubbly, and double in size within a few hours after feeding. Once you get into a regular baking routine, you can always put your starter "on pause". Do this by placing it in the fridge right after a feed. The lower temperatures will allow you to only feed your starter once per week.
Video
Notes
How do I know my starter is ready for use?
- Rising Activity: A mature starter should visibly rise and double in volume after a feeding. This rise indicates that the yeast population is active and producing carbon dioxide gas, which leads to leavening in your bread.
- Bubbling: Active fermentation results in the formation of bubbles throughout the starter. As you feed the starter, you'll notice a network of small and large bubbles forming on the surface and within the mixture.
- Aroma: A mature starter will have a pleasant and slightly tangy aroma. It should smell mildly sour but not overwhelmingly pungent or off-putting. A strong, vinegary smell might indicate that the starter is overripe or not well-balanced.
- Texture: The starter's texture should be elastic and slightly stretchy. When you scoop a spoonful, it should show signs of elasticity, indicating the presence of gluten development.
- Consistency: The starter's consistency might vary depending on hydration levels and flour type, but it should generally be creamy, with a somewhat smooth texture. A thin, watery starter might need more feeding and time to develop.
- Dome Formation: After feeding, your starter might form a slight dome on top. This suggests that the starter is actively producing gases and expanding.
- Predictable Behavior: A mature starter will show consistent patterns of rising and falling after feedings. If you notice that your starter consistently doubles in volume within a certain timeframe after feeding, it's a good sign of readiness.
- Time Elapsed: Depending on the temperature and feeding schedule, a starter can take anywhere from a week to a few weeks to mature. Generally, a mature starter should be consistently exhibiting the above signs over several feedings.


Comments
No Comments