Sourdough Starter
Easy sourdough starter recipe that will have you ready to bake all things sourdough in no time
Equipment
- glass jar
- Cloth
- Rubber band
- Proofing Box
Ingredients
- ½ cup water
- ½ cup flour of choice
Instructions
- Day 1: In a clean glass or plastic container, mix ½ cup of flour and ½ cup of water until well combined. The mixture should have the consistency of a thick pancake batter. Cover loosely with a cloth and a rubber band or plastic wrap. This will allow air to enter but will keep contaminants and fruit flies out. Place in a spot where you believe the temperature will be best for your sourdough starter. More ideas on this are below.
- Days 2-7: Once a day, discard about half of the starter (or transfer it to another container for later use). Add ½ cup of flour and ½ cup of water to the remaining starter. Stir well to combine. This daily feeding helps establish and strengthen the starter. It provides fresh nutrients for the yeast and bacteria to feed on.
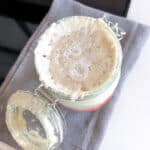
- Watch for Activity: As the days progress, you should start to see signs of fermentation. The signs include bubbles forming and the mixture becoming frothy. This indicates that the natural yeast and bacteria in the environment are colonizing and fermenting the starter. You can place a rubber band on the outside of the jar to mark the level of your starter at the beginning of the fermentation window. This will help you see how much it has risen by the next feeding.
- Establishing a Feeding Schedule: Feed your starter around the same time each day. By around day 7, your sourdough starter should be active and ready to use. It is now suitable for recipes that call for "sourdough discard". It should have a pleasant sour smell, be bubbly, and double in size within a few hours after feeding. Once you get into a regular baking routine, you can always put your starter "on pause". Do this by placing it in the fridge right after a feed. The lower temperatures will allow you to only feed your starter once per week.
Video
Notes
How do I know my starter is ready for use?
- Rising Activity: A mature starter should visibly rise and double in volume after a feeding. This rise indicates that the yeast population is active and producing carbon dioxide gas, which leads to leavening in your bread.
- Bubbling: Active fermentation results in the formation of bubbles throughout the starter. As you feed the starter, you'll notice a network of small and large bubbles forming on the surface and within the mixture.
- Aroma: A mature starter will have a pleasant and slightly tangy aroma. It should smell mildly sour but not overwhelmingly pungent or off-putting. A strong, vinegary smell might indicate that the starter is overripe or not well-balanced.
- Texture: The starter's texture should be elastic and slightly stretchy. When you scoop a spoonful, it should show signs of elasticity, indicating the presence of gluten development.
- Consistency: The starter's consistency might vary depending on hydration levels and flour type, but it should generally be creamy, with a somewhat smooth texture. A thin, watery starter might need more feeding and time to develop.
- Dome Formation: After feeding, your starter might form a slight dome on top. This suggests that the starter is actively producing gases and expanding.
- Predictable Behavior: A mature starter will show consistent patterns of rising and falling after feedings. If you notice that your starter consistently doubles in volume within a certain timeframe after feeding, it's a good sign of readiness.
- Time Elapsed: Depending on the temperature and feeding schedule, a starter can take anywhere from a week to a few weeks to mature. Generally, a mature starter should be consistently exhibiting the above signs over several feedings.
