The Best Sourdough Chocolate Chip Scones Recipe
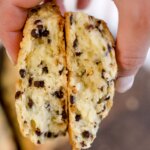
These sourdough chocolate chip scones are tender, buttery, and studded with rich chocolate—perfect for breakfast, snacks, or a sweet treat.
Servings 8
Calories 1kcal
Equipment
- Baking Sheet Parchment Paper
Ingredients
- 2 cups + 2 teaspoons 250 g all-purpose flour
- ½ cup 100 g granulated sugar
- ½ teaspoon 2.5 g fine sea salt
- 2 teaspoons baking powder
- 1 stick 113 g unsalted butter (frozen or very cold)
- 1 cup 180 g dark chocolate chips
Wet Ingredients
- ½ cup 125 g sourdough starter discard
- 1 large egg
- 2 teaspoons 10 g vanilla extract
- 2 tablespoons 30 g heavy cream (milk or half and half can be used)
Instructions
- Cut the butter into cubes and put in the freezer while you prepare the rest of the ingredients.
- In a large mixing bowl, combine the dry ingredients: flour, sugar, baking powder, chocolate chips, and salt. Stir to mix.2 cups + 2 teaspoons, ½ cup 100 g granulated sugar, ½ teaspoon 2.5 g fine sea salt, 2 teaspoons baking powder, 1 cup 180 g dark chocolate chips
- In a separate bowl, whisk together the wet ingredients: egg, sourdough starter, heavy cream, and vanilla extract.½ cup 125 g sourdough starter discard, 1 large egg, 2 teaspoons 10 g vanilla extract, 2 tablespoons 30 g heavy cream (milk or half and half can be used)
- Using a pastry blender, cut the cold butter into the dry ingredients until the mixture resembles small peas.1 stick
- Pour the liquid ingredients into the large bowl with the dry mixture. Mix initially with a spoon, then use your hands to knead the dough just until it forms a ball. Avoid over-kneading the dough; less handling is better. It should be shaggy & rough.
- Transfer the dough to a lightly floured surface, shaping it into a disk that's about one inch (2.5cm) thick. Divide this disk into eight wedges using a sharp knife.
- Preheat your oven to 400 degrees F (200C). While the oven heats, chill the unbaked scones in the refrigerator for 10 to 15 minutes. Prepare a baking sheet by lining it with parchment paper.
- Once the oven is at temperature, take the dough out of the fridge, arrange the scones on the prepared baking sheet ensuring they do not touch. Use a bench scraper to help with the transfer.
- Bake for 20-25 minutes or until they are golden brown. After baking, transfer the scones to a wire rack to cool.
Notes
Tips
- Keep Ingredients Cold: Cold butter and egg are key for flaky, tender scones. You can even chill your mixing bowl and utensils.
- Butter Texture: Cut butter into the flour until it looks like coarse crumbs or small peas—this creates steam pockets that help the scones rise.
- Handle Lightly: Don’t overwork the dough. Mix just until it comes together, and knead very gently to avoid tough scones.
- Chill Before Baking: Let shaped scones rest in the fridge for 10–15 minutes before baking. This keeps the butter cold for a better rise and texture.
- Even Sizes: Cut the dough into equal wedges or rounds so they bake evenly.
- Give Them Space: Place scones apart on the baking sheet to allow room for spreading and even browning.
- Check Doneness: Tops should be golden and feel firm. A toothpick inserted in the center should come out clean or with a few crumbs.
- Cool Slightly: Let them cool a bit before glazing so it sets properly instead of melting into the warm scones.
Storage
- Short-Term (1–2 Days): Let the scones cool completely, then store in an airtight container at room temperature in a cool, dry spot. Best eaten fresh within 1–2 days.
- Freezing (2–3 Months): Cool scones completely (unglazed if possible), wrap tightly in plastic wrap or foil, and place in a freezer-safe bag or container. Thaw overnight in the fridge or at room temperature. Reheat in a 300°F (150°C) oven for about 10 minutes before glazing.
- Reheating: For fresh texture, warm room-temperature or thawed scones in the oven at 300°F (150°C) for 5–10 minutes. Avoid the microwave—it can make them soggy.
Nutrition
Calories: 1kcal | Carbohydrates: 0.4g | Protein: 0.01g | Fat: 0.001g | Sodium: 106mg | Potassium: 0.3mg | Fiber: 0.01g | Calcium: 59mg | Iron: 0.1mg
