How to Incubate Duck Eggs & Hatch Your Own Ducks
How to incubate ducks: A comprehensive guide to hatching duck eggs successfully at home, simplifying the process for beginners.
Equipment
- Incubator
- Duckling Brooder Box
Ingredients
- Fertile Hatching Eggs
Instructions
- Gather eggs: use your own fertilized eggs, source them locally or buy online and have them shipped via the post office. Either way, store eggs at room temperature, tip facing downwards for at least 24 hours before going into the incubator.
- Preheat incubator: Most incubators require to be running for a couple hours before the eggs go in. If this is your first time using a new incubator, make sure to follow the calibration instructions for both temperature and humidity calibration.
- Insert Eggs: When the incubator temperature and humidity levels are up to your desired levels, it's time to load it up with eggs. We incubate our ducks at 37.5C ( 99.5 F) with a humidity of 55-60% for the first 25 days. Make sure to use clean eggs, however do not wash them off. Eggs for incubation need to have the bloom (naturally occurring bacteria) on their surface intact. Dirty eggs could introduce bacteria into the incubator and not only will the probably not hatch, but they could negatively affect the hatching process of the other eggs too.
- Maintain: Now comes the marathon part of the incubation process. For the next 25 days, your job is to maintain the desired temperature and humidity as closely as possible. The more automatic your incubator, the less work this will be for you. For us, the only thing we have to really watch is the humidity level. Our incubator has two small holes on the side that are in place for water refills. If any of the levels fall below the programmed setting, the incubator will set off an alarm that usually even wakes us at night.
- Hatch: On day 25, it is time to take the eggs out of the egg turning tray, and increase the humidity to 65-70% and the temperature to__. Then you just sit back and look for the first pip!
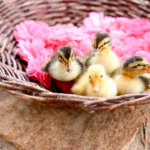
- Baby Ducks: Once a baby duck hatches, leave it in the incubator for at least 24 hours to allow it to fully dry out. Then, make sure that no other eggs are pipped before quickly opening the incubator lid and removing all the fluffy ducklings. Transfer to your brooder box.
- Be patient: Give ducks enough time to hatch. During our last incubation round, ducklings were hatching even several days after the 28 day mark. We generally keep the incubator running until day 35. Any unhacthed eggs can be discarded by that point.
- Clean the incubator: make sure to wash out your incubator thoroughly, preferably without the use of any chemicals. We usually use a white wine vinegar solution and warm water. Allow is to air out outside, then carefully store away before you will need it for your next round of incubating.
Video
Notes
- Choose Healthy Eggs: Select clean, undamaged eggs with no cracks for better hatch rates.
- Temperature and Humidity: Maintain a consistent temperature of around 99.5°F (37.5°C) and humidity of 55-60% for the incubation period.
- Monitor Air Quality: Ensure good ventilation in the incubator to provide fresh air while preventing drafts that could chill the eggs.
- Late Turning: Stop turning the eggs on day 25 to prepare for hatching. Increase humidity to 65-70% for the last few days.
- Prepare for Hatching: Create a calm, quiet environment for hatching. Avoid opening the incubator unnecessarily during this time.
- Post-Hatch Care: Transfer ducklings to a warm, clean brooder with access to water and chick starter feed. Ensure they have space to move around.
- Learn from Experience: Each hatch can teach valuable lessons. Take notes on what works best in terms of temperature, humidity, and handling.
- Patience is Key: Incubating duck eggs may take longer than chicken eggs (typically around 28 days), so be patient throughout the process.