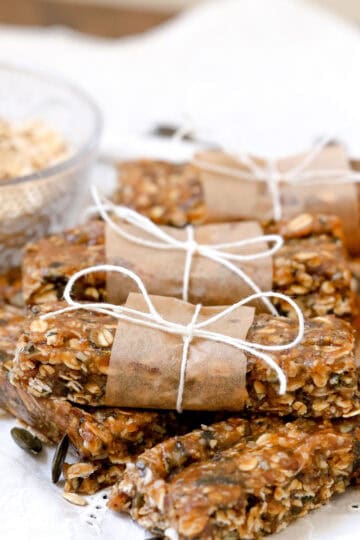
Crunchy Sourdough Granola {Easy Discard Recipe}
Savor the crunch with our customizable Sourdough Granola recipe, perfect for transforming excess starter into a delightful snack or breakfast treat.

To my great surprise, our cow Heidi is still giving us plenty of milk. Even though it's been over a year since she had her calf, Zorka, and even though she is pregnant again, the milk just keeps coming. My favorite thing to make when we have a surplus of raw milk, is Instant Pot raw milk yogurt. And my favorite way to eat fresh yogurt is with this homemade granola. Not only is it absolutely delicious and so delightfully crunchy. It also helps use up excess sourdough starter (which I always have plenty of lurking in my fridge) and it's fully customizable. As long as I have a few of the staples on hand, I can pretty much always which up a version of this sourdough granola recipe. Aaron loves it as a delicious snack, or special treat after he finishes his eggs for breakfast.

This article may contain affiliate links, which means I make a small commission at no extra cost to you. As an Amazon Associate, I earn from qualifying purchases at no extra cost to you. You can read the full disclosure policy.
Why You'll Love This Recipe
- Store-bought granola is expensive and full of undesirable additives. It's also extremely high in sugar, which no one wants, but you especially don't want to be serving that to littles. This easy sourdough discard granola recipe uses only naturally occurring sugar from maple syrup. If you want it truly low sugar, you can even skip it all together!
- This recipe is super easy to make, and is full of wholesome ingredients. You probably already have most of them in your pantry!
- You can make variations of the base recipe with whatever you have on hand. You can also choose whether you'll make large clusters for chunky sourdough granola, or just regular granola compared of smaller pieces.
- It's a great way to use your excess sourdough starter discard!
Come spend a Spring Day with me in my Farmhouse kitchen, where I show you how I make this granola recipe and then take my family on a picnic by the lake.
Ingredients
- ½ cup sourdough starter discard (or active starter)
- 2 cups rolled oats
- 2 tbs melted coconut oil
- ½ cup maple syrup
- 1 teaspoon cinnamon
- ½ teaspoon nutmeg
- ¼ teaspoon salt
- ¼ cup sunflower seeds (pumpkin seeds or hemp seeds also work well)
- 2 tbs chia seeds
- ½ cup chopped nuts
- Optional: raisins or other dry fruit of choice
Instructions
- Preheat oven to 350F (180C). Line a baking sheet with parchment paper.
- In a large mixing bowl, mix all the wet ingredients: sourdough starter, coconut oil, maple syrup, and your spices (cinnamon, nutmeg & salt).
- Whisk together using a hand whisk or the whisk attachment on your standing mixer.
- Add in all the dry ingredients: oats, nuts & seeds. Mix everything together well.
- Spread in an even layer on your prepared baking sheet. Leave the mixture mostly stuck together in a "sheet", avoid breaking up too much. This will ensure your granola sticks together in clusters and doesn't come apart.
- Bake in a preheated oven for 20 - 30minutes, until golden brown. Making sure the granola doesn't burn in this stage.
- Once fully baked, set out and allow to cool before breaking up into your desired size of clusters.

FAQ
How do I ensure my granola is crunchy?
To ensure your granola is crunchy, spread it out evenly on a baking sheet, and avoid breaking it up during the baking process.
What are some flavor variations I can try?
Some flavor variations to try include adding ingredients like honey, brown sugar, vanilla extract, cinnamon, nuts, seeds, or dried fruits.
Can I make sourdough granola gluten-free?
Yes, you can make sourdough granola gluten-free by using gluten-free oats and ensuring all other ingredients are gluten-free.
What are some tips for preventing my granola from burning?
To prevent burning, keep an eye on the granola while baking, and consider lowering the oven temperature if necessary.
Can I add dried fruits to my sourdough granola?
Yes, you can add dried fruits like raisins, cranberries, apricots, or chopped dates to your sourdough granola.
Is it possible to make sourdough granola without nuts?
Yes, you can make sourdough granola without nuts by omitting them or substituting them with seeds or additional dried fruits.

Tips
- Use Discard Starter or Active Sourdough Starter : Utilize your discard sourdough starter to reduce waste, or use active sourdough starter if that's what you've got on hand.
- Spread Evenly: Spread the granola mixture evenly on a baking sheet to ensure even baking and crispy texture.
- Customize Flavors: Experiment with different flavor combinations by adding ingredients like honey, maple syrup, vanilla extract, cinnamon, nuts, seeds, or dried fruits.
- Watch Closely: Keep an eye on the granola as it bakes to prevent it from over-browning or burning. It can go from golden to burnt quickly.
- Cool Completely: Allow the granola to cool completely on the baking sheet before storing it to ensure maximum crunchiness.
- Break into Clusters: For chunky granola clusters, press the mixture together slightly before baking and avoid stirring too much while it's cooling.
- Experiment: Don't be afraid to experiment with different ingredients and ratios to find your perfect sourdough granola recipe.

Storage
- Airtight Container: Store the cooled granola in an airtight container at room temperature. This helps maintain its crunchiness and freshness.
- Glass Jars: Transfer the granola to a glass jar with a tight-fitting lid. Mason jars or other sealed containers work well for this purpose.
- Zip-Top Bags: Portion the granola into zip-top bags, press out excess air, and seal tightly. This method is convenient for grab-and-go snacks or for storing smaller quantities.
- Vacuum Sealer: If you have a vacuum sealer, use it to remove air from the storage bags or containers, which helps prolong the granola's shelf life.
- Refrigerator: If you live in a hot or humid climate, or if you prefer your granola to stay extra fresh, store it in the refrigerator. Just make sure it's in an airtight container to prevent absorption of odors.
- Freezer: Granola can be frozen for longer-term storage. Place it in a freezer-safe container or bag, removing as much air as possible, and store it in the freezer for up to several months. Allow it to come to room temperature before serving.
- Individual Servings: Portion the granola into single-serving containers or bags for easy grab-and-go snacks. This is convenient for lunch boxes, office snacks, or portion-controlled servings.
- Layered with Parchment Paper: If stacking granola in a container, consider layering it with parchment paper between each layer to prevent clusters from sticking together.
- In a Decorative Tin: Store your granola in a decorative tin or tin-lined container for a charming presentation on your kitchen counter or pantry shelf.
- In a Cereal Dispenser: If you have a cereal dispenser with an airtight seal, fill it with your sourdough granola for a convenient and visually appealing storage solution.
📖 Recipe

Crunchy Sourdough Granola {Easy Discard Recipe}
Ingredients
- 2 cups rolled oats
- 1 teaspoon cinnamon
- ¼ cup sunflower seeds pumpkin seeds or hemp seeds also work well
- ½ cup chopped nuts
- ½ teaspoon nutmeg
- ¼ teaspoon salt
- Optional: raisins or other dry fruit of choice
- ½ cup sourdough starter discard or active starter
- ½ cup maple syrup
- 2 tbs melted coconut oil
- 2 tbs chia seeds
Instructions
- Preheat oven to 350F (180C). Line a baking sheet with parchment paper.
- In a large mixing bowl, mix all the wet ingredients: sourdough starter, coconut oil, maple syrup, and your spices (cinnamon, nutmeg & salt).1 teaspoon cinnamon, ½ teaspoon nutmeg, ½ cup sourdough starter discard, ½ cup maple syrup, 2 tbs melted coconut oil, ¼ teaspoon salt
- Whisk together using a hand whisk or the whisk attachment on your standing mixer.
- Add in all the dry ingredients: oats, nuts & seeds. Mix everything together well.2 cups rolled oats, ¼ cup sunflower seeds, ½ cup chopped nuts, 2 tbs chia seeds, Optional: raisins or other dry fruit of choice
- Spread in an even layer on your prepared baking sheet. Leave the mixture mostly stuck together in a "sheet", avoid breaking up too much. This will ensure your granola sticks together in clusters and doesn't come apart.
- Bake in a preheated oven for 20 - 30minutes, until golden brown. Making sure the granola doesn't burn in this stage.
- Once fully baked, set out and allow to cool before breaking up into your desired size of clusters.
Video
Notes
- Use Discard Starter or Active Sourdough Starter : Utilize your discard sourdough starter to reduce waste, or use active sourdough starter if that's what you've got on hand.
- Spread Evenly: Spread the granola mixture evenly on a baking sheet to ensure even baking and crispy texture.
- Customize Flavors: Experiment with different flavor combinations by adding ingredients like honey, maple syrup, vanilla extract, cinnamon, nuts, seeds, or dried fruits.
- Watch Closely: Keep an eye on the granola as it bakes to prevent it from over-browning or burning. It can go from golden to burnt quickly.
- Cool Completely: Allow the granola to cool completely on the baking sheet before storing it to ensure maximum crunchiness.
- Break into Clusters: For chunky granola clusters, press the mixture together slightly before baking and avoid stirring too much while it's cooling.
- Experiment: Don't be afraid to experiment with different ingredients and ratios to find your perfect sourdough granola recipe.
Storage
- Airtight Container: Store the cooled granola in an airtight container at room temperature. This helps maintain its crunchiness and freshness.
- Glass Jars: Transfer the granola to a glass jar with a tight-fitting lid. Mason jars or other sealed containers work well for this purpose.
- Zip-Top Bags: Portion the granola into zip-top bags, press out excess air, and seal tightly. This method is convenient for grab-and-go snacks or for storing smaller quantities.
- Vacuum Sealer: If you have a vacuum sealer, use it to remove air from the storage bags or containers, which helps prolong the granola's shelf life.
- Refrigerator: If you live in a hot or humid climate, or if you prefer your granola to stay extra fresh, store it in the refrigerator. Just make sure it's in an airtight container to prevent absorption of odors.
- Freezer: Granola can be frozen for longer-term storage. Place it in a freezer-safe container or bag, removing as much air as possible, and store it in the freezer for up to several months. Allow it to come to room temperature before serving.
- Individual Servings: Portion the granola into single-serving containers or bags for easy grab-and-go snacks. This is convenient for lunch boxes, office snacks, or portion-controlled servings.
- Layered with Parchment Paper: If stacking granola in a container, consider layering it with parchment paper between each layer to prevent clusters from sticking together.
- In a Decorative Tin: Store your granola in a decorative tin or tin-lined container for a charming presentation on your kitchen counter or pantry shelf.
- In a Cereal Dispenser: If you have a cereal dispenser with an airtight seal, fill it with your sourdough granola for a convenient and visually appealing storage solution.

Comments
No Comments